Chocolate Bark

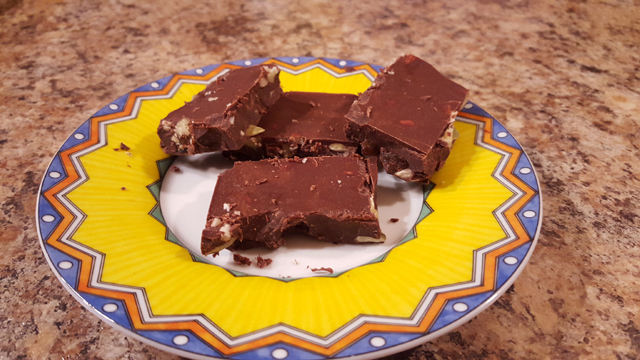
Once you eat this chocolate bark you will not be able to buy a chocolate bar from the store anymore. This is so easy to make and you can’t really go wrong. You taste it as you go and you can make it exactly the way you want.

Basic ingredients:
½ cup cacao butter
½ cup cacao powder
Maple syrup to taste
Salt to taste

Optional ingredients: (one or a combination of)
Dry raisins
Dry cranberries
Pumpkin seeds
Sunflower seeds
Hemp seeds
Crushed nuts (almonds or walnuts or pecan)
Chili pepper (for a nice spicy chocolate)

Directions:
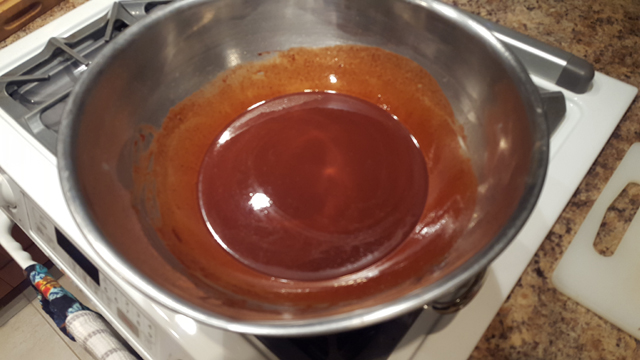
1. Place the cacao butter in a double boiler.
2. Once the cacao butter starts to melt, reduce the heat or even turn it off. You don’t want it to become hot, just melted. If it stops melting, raise the heat a little.
3. With the help of a sifter, slowly sprinkle the cacao powder on the melted cacao butter.
4. Mix the cacao butter and cacao powder together as you are sifting.
5. Add the maple syrup to the chocolate liquid and keep mixing.
6. Add salt.
7. Taste and adjust to the darkness, sweetness or salt amount to your liking.
2015-10-29 19.32.04
8. Place a parchment paper with the side raised in the bottom pan or Pyrex.
9. Uniformly sprinkle the dry fruits, nuts, and seeds in the bottom of the pan.
2015-10-29 19.31.58
10. Pour the melted chocolate mixture into the seeds and nuts.
2015-10-29 19.35.10
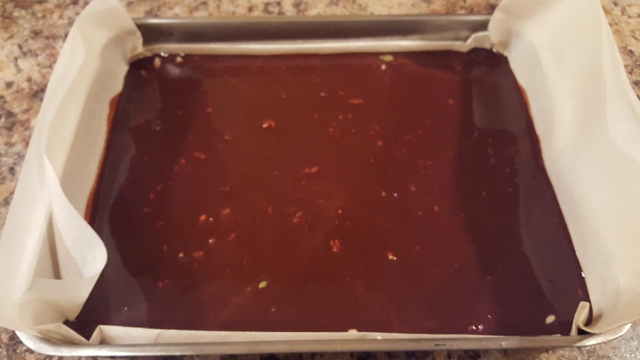
11. Place it in the refrigerator or freezer for 20 minutes or so. You can also sprinkle coarse salt, hemp seeds or sesame seeds on top for garnish.
12. Before it gets completely hard, you can cut into the preferred pieces sizes and place back in the refrigerator.
2015-10-29 20.31.12

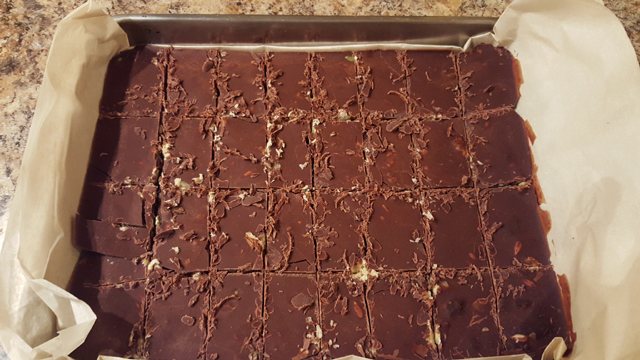
Or once ready you can just break it by hand into pieces and enjoy.

The nice thing about using cacao butter is that your chocolate will not soften or melt when outside refrigerator, unlike coconut butter that melts with the temperature of your fingers and is very soft at room temperature.

Have fun and be creative.

Would you like more recipes like this one?
Click Here to Subscribe

Why am I doing this?

I would like to share with you why I am so passionate about what I do. I am passionate about cancer and finding natural way to treat this disease because when I was 24 years old my father died from pancreatic cancer and in 2009, my mother died from lung cancer. It was really difficult for me to be standing by and not know anything about the illness and what could be done to stop it or even just slow it down.

After my mom passed, I found Marcus Freudenmann and his work. He was promoting a book and movie named “Cancer is curable now, with common sense”. I was really impressed with his approached. He didn’t sound like a charlatan or a crook, like so many others. He based his work on science and research. He traveled around the world to find answers about how to heal cancer and other degenerative diseases.

Since then I have followed him and listened to other people like him who believe that cancer is not the end of the road. Unfortunately the big-pharma, money-making cancer industry; doesn’t want people to stop using their products and services because they have too much at stake, i.e. money $$$. There is an interesting movie called “Cut Poison Burn”, which talks about how the medical industry can only promote these solutions when a patient is diagnosed with cancer… Click here to watch the movie preview.

I strongly believe that cancer is preventable and I want to make it my life mission to promote this idea to as many people as possible. So, when Marcus announces his second world tour, I immediately contacted him and told him that he had to come to Vancouver. I know that people here are very open minded about living a healthy life. We are an active community that loves the outdoor and smart and healthy living. This is why you joined this group in the first place. You wanted to find ways to eat better and to learn tips and tricks about health. This is why I am telling you more about Marcus visit now, as I would hate for you to have missed the opportunity to attend his workshop.

Follow the post to find more details about the “Truly Heal Workshop” that is coming here on April 18-19 2015.

Please contact me either by email or write a comment below to ask me questions or just to share your opinions. I would love to hear from you.

Until next time, be happy and healthy
Denise Belisle

Raw Cashew Blackberry Vanilla Dreamcake

This Dreamcake is so delicious. Very easy to make and you will pretty much always make it to perfection. I often use double the recipe, this way it makes a nice thick cake. On the picture above the recipe was made as described below.

This recipe is made with cashews. I love making recipes with them because they can make a really creamy mixture and you can add any flavors to it and it will taste great. Initially, I did not soak my cashews when I was making recipes, whether I was making “cream cheese” like mixtures or cake and I thought they were hard to digest. Since then, I make sure that I soak them overnight for at least 12 hours and it changed everything. My recipes are now so much creamier and I don’t have any problems with the digestion anymore.

Do you know where cashews come from?  Read this post to find out.

Ingredients:
Crust:
1/2 cup raw almonds (pecan or walnuts will also work)
1/2 cup soft Medjool dates
¼ tsp. sea salt

Filling:
1 ½ cups raw cashews, soaked for at least 5 hours, overnight is preferred
juice of 2 lemons
the seeds of 1 whole vanilla bean (or 1 tsp. alcohol-free vanilla extract)
1/3 cup raw coconut oil, melted
1/3 cup raw honey (solid or liquid.)(Vegans use agave nectar.)
1 cup blackberries or any berries (thaw completely if using frozen)

Directions:

  1. Place nuts and dates in a food processor with sea salt and pulse to chop until they are to your desired fineness (process longer for a finer crust than vs. chunky crust). Test the crust by spooning out a small amount of mixture and rolling it in your hands. If the ingredients hold together, your crust is perfect. Scoop out crust mixture into a 7” spring-form pan (if you don’t have a spring-form pan, use a pie plate lined with saran wrap), and press firmly, making sure that the edges are well packed and that the base is relatively even throughout. Rinse food processor well.
  2. Warm coconut oil and honey in a double boiler on low heat until liquid. Whisk to combine.
  3. In the most powerful food processor/blender you own (you decide which one has the most torque) place all filling ingredients (except raspberries) and blend on high until very smooth (this make take a couple minutes so be patient). If you have a Vita-Mix, absolutely use it.
  4. Pour about 2/3 (just eyeball it, you can’t make a mistake!) of the mixture out onto the crust and smooth with a spatula. Add the raspberries to the remaining filling and blend on high until smooth. Pour onto the first layer of filling. Place in freezer until solid.
  5. To serve, remove from freezer 30 minutes prior to eating. Run a smooth, sharp knife under hot water and cut into slices. Serve on its own or with fresh fruit. Store leftovers in the freezer (what leftovers?).

Would you like more recipes like this one?

Click Here to Subscribe